In the field of remote server administration, few tools command the trust and esteem that PuTTY does. Whether you’re a seasoned sysadmin, an aspiring developer, or an individual seeking secure and efficient remote access, PuTTY stands as your dependable gateway.
But how to use putty? This comprehensive guide will lead you through the intricacies of PuTTY’s utilization. From the initial installation to advanced configuration options, we’ll navigate this indispensable software together, demystifying every step.
Join us as we delve into the world of PuTTY and provide you with the knowledge and skills to navigate the digital landscape confidently, especially in the realm of acxact connections. Let’s dive in and uncover the secrets of how to use PuTTY to streamline your remote connections and enhance your computing experience.
What is putty?
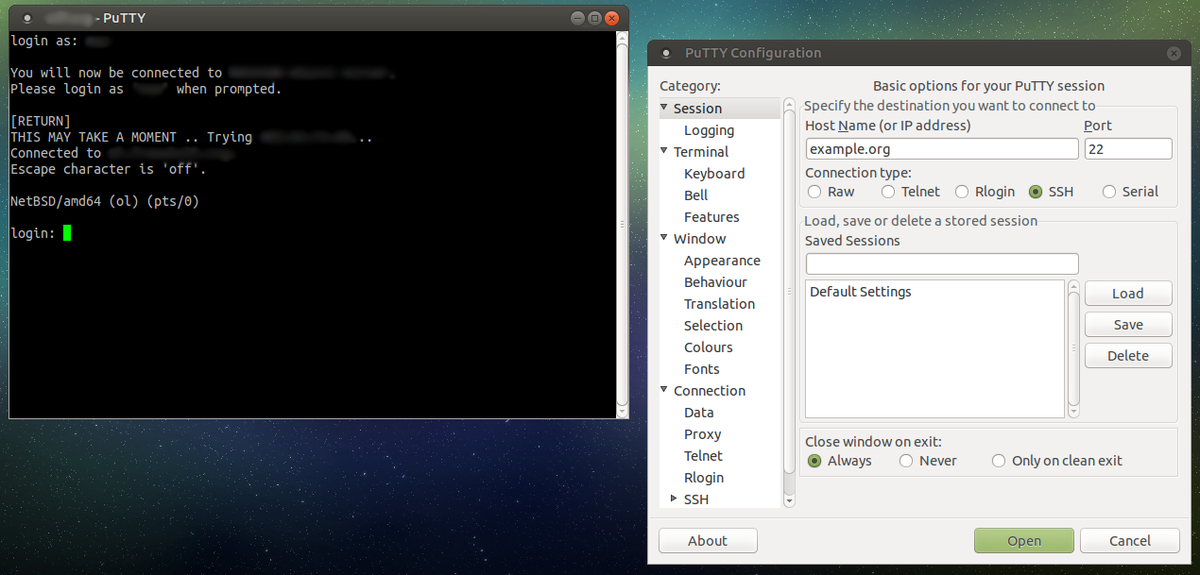
Putty is a free and open-source software that acts as a terminal emulator, serial console and network file transfer application. In simpler terms, it’s a tool that lets you connect to other computers and devices remotely.
Here’s a breakdown of what Putty can do:
- Terminal emulation: Putty provides a window that mimics a terminal, allowing you to interact with the remote machine or the VPS Server using text commands. This is useful for system administration tasks, configuration, and troubleshooting.
- Secure connections: Putty supports various protocols for secure connections, including SSH Protocol, which is the most common choice for remote logins.
- File transfer: Putty enables you to transfer files between your computer and the remote machine using protocols like SCP. Putty is a popular choice for users, especially on Windows, due to its ease of use and versatility.
If you’re managing a Linux VPS, learning how to use Putty will equip you with the tools to connect and administer your server remotely.
Key features of PuTTY
-
SSH support
PuTTY is widely used for SSH connections, which provide secure and encrypted communication between the local and remote systems. If you ask how to use putty ssh, follow this tutorial.
-
Telnet support
While less secure than SSH, PuTTY also supports Telnet connections for connecting to devices that still use this protocol.
-
Serial connection support
PuTTY can be used for connecting to devices over serial ports, making it suitable for managing network equipment such as routers, switches, and serial console servers.
-
X11 forwarding
PuTTY can be configured to forward X Window System (X11) applications over SSH, allowing you to run graphical applications on a remote server and display them on your local machine.
-
Port forwarding
It supports various types of port forwarding, including local, remote, and dynamic port forwarding, which can be useful for creating secure tunnels and accessing services on remote servers.
-
Session management
PuTTY allows you to save connection profiles, making it easy to quickly connect to your frequently used remote systems.
-
Customization
Users can customize the appearance and behavior of PuTTY’s terminal emulator to suit their preferences.
Overall, PuTTY is a versatile and widely used tool for remote system administration and network troubleshooting.
It’s a free and open-source software, which means it’s readily available for download and use by anyone who needs it. However, there are also alternative terminal emulators available with similar functionality and features.
How to use putty in windows step to step
Putty is mostly used in windows operating system. Using PuTTY in Windows is relatively straightforward. PuTTY is a standalone executable, so you can even run it without needing to install it.
Here’s a step-by-step guide on how to use PuTTY in Windows. You can also use this guide to learn how to use putty software.
-
Download PuTTY
You can download the latest version of PuTTY SSH from its official website. You need to select the right “bit” version according to your computer system. So do these steps to download Putty for windows:
– Go to the official PuTTY website at (https://www.putty.org/)
– Under the “Download PuTTY” section, you’ll find various PuTTY executables. Most users can simply download the “Windows Installer” version, which includes PuTTY, PuTTYgen (for key generation), and Pageant (an SSH authentication agent). Click on the link to download the right version of putty installer for your system.
-
Install PuTTY
When the file is downloaded, run the installer to start the setup.
Follow the installation wizard’s instructions. You can typically leave the default settings as they are unless you have specific preferences in mind.
-
Launch PuTTY
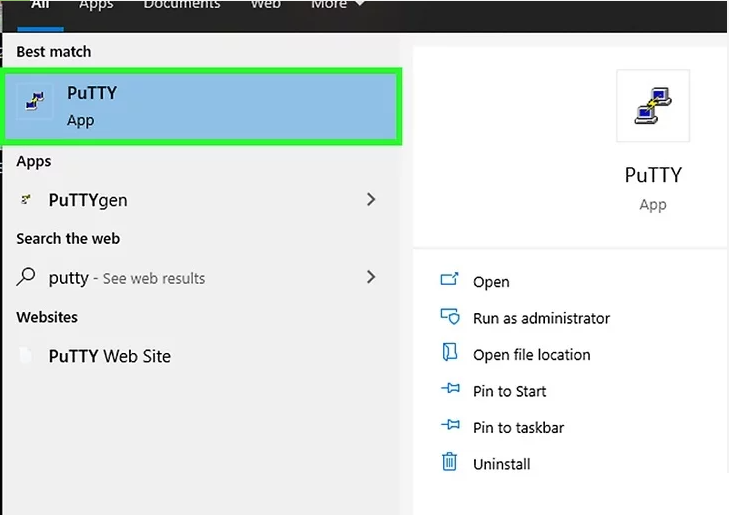
– After installation, you can find PuTTY in your Start menu. Open the Start menu, type “PuTTY,” and select the PuTTY program.
-
Configure a Connection
To securely connect to a remote server like vps server via PuTTY using SSH, you’ll need to gather some key credentials:
- Server Name or IP Address
- SSH port
- SSH username
- SSH password
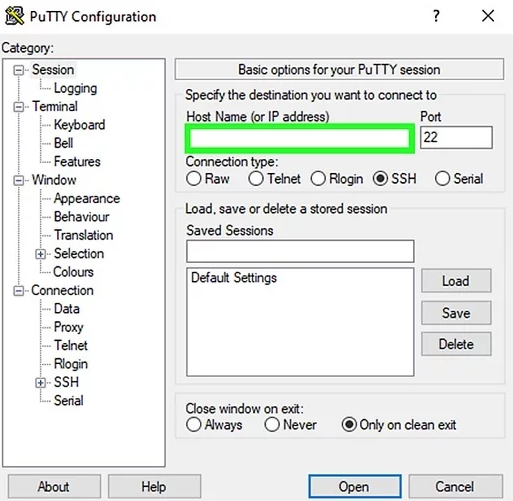
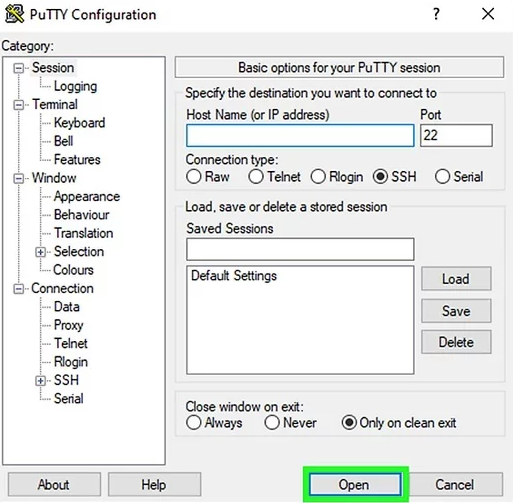
So when the sftware launches, you’ll see the “PuTTY Configuration” window.
In the “Host Name (or IP address)” field, enter the hostname or IP address of the remote server you want to connect to.
Choose the connection type by selecting the appropriate protocol (e.g., SSH for secure connections).
Ensure that the port number is set correctly. For SSH, the default port is 22.
You can save these settings for future use by entering a name in the “Saved Sessions” field and clicking the “Save” button.
-
Optional Configuration
– You can configure various settings under different categories in the left-hand menu. For example, you can adjust the appearance, set up SSH key authentication, configure tunneling, and more.
– Make any necessary configuration changes according to your needs.
-
Putty connection
– Once you’ve configured the connection settings, click the “Open” button at the bottom of the PuTTY Configuration window.
– A terminal window will open, and PuTTY will attempt to establish a connection to the remote server.
-
Login
– When prompted, enter your username and password for the remote server. Note that if you’ve set up SSH key authentication, you may not need to enter a password.
– Press Enter to submit your login credentials.
-
Interact with the Remote Server
– Once connected, you can interact with the remote server through the PuTTY terminal window. You can run commands, edit files, and perform various tasks as if you were directly logged into the remote system.
-
Logout and Exit
– When you’re finished with your session, you can logout from the remote server as you would in a regular terminal.
– To exit PuTTY, simply close the PuTTY terminal window.
That’s the basic process of using PuTTY in Windows to connect to a remote server. Remember to save your session settings if you want to easily reconnect to the same server in the future without re-entering all the details.
How to use PuTTY in Linux
Users mostly use the preinstalled OpenSSH on Linux operating system. However, you should know that PuTTY is mostly used for debugging and connecting to serial ports and to raw sockets on Linux.
On Debian distribution, use the following command:
sudo aptitude install putty
Followed by the tools installation command:
sudo aptitude install putty-tools
Conclusion
In summary, PuTTY is a versatile and powerful tool for establishing secure connections to remote servers and devices. This guide has provided a comprehensive overview of PuTTY, covering everything from its installation to advanced configurations.
By mastering its features, you can simplify your workflow, boost productivity, and ensure the safety of your remote connections.
As you continue to use PuTTY, your confidence in its capabilities will grow, making it an essential component of your toolkit for managing and interacting with remote systems.
FAQ
-
What is the default username and password when connecting with PuTTY?
– PuTTY itself does not have default login credentials. You will need to provide the username and password specific to the remote server or device you are connecting to. Some systems may use a default username such as “root” or “admin,” but the password will depend on the server’s configuration.
-
How do I save my PuTTY session settings for future use?
– To save your session settings, open PuTTY, configure your connection settings (hostname, port, etc.), and enter a name for your session in the “Saved Sessions” field. Click the “Save” button. The session settings will be saved for easy access in the future.
-
Can I use SSH key authentication with PuTTY?
– Yes, PuTTY supports SSH key authentication. To use SSH key authentication, you need to generate an SSH key pair (public and private keys) using PuTTYgen or another tool.
Then, in the PuTTY configuration, navigate to the “SSH” category and browse to your private key file under “Auth.” When you connect to the remote server, PuTTY will use the private key for authentication.
-
How do I transfer files with PuTTY?
– PuTTY itself is primarily a terminal emulator and does not have built-in file transfer capabilities. However, you can use auxiliary tools like PSCP (PuTTY Secure Copy) or WinSCP to transfer files securely over SSH with PuTTY.
These tools provide a graphical interface for file transfer and work seamlessly with PuTTY’s SSH sessions.


